In my opinion the best UI designs are ones that allow users access to and the ability to modify as much information in as possible in as little time as possible. A recent trend in table views has significantly expedited the process of modifying the contents of a table view very quickly and intuitively. This is a blog post about one of my favorite UI based cocoa pods, MCSwipeTableViewCell.

Mailbox started this trend almost two years ago with their wildly popular third party e-mail app. What they do is give you a standard looking table list view with relevant mail information on each cell. However as the above diagram shows it also gives you the option to swipe the cell to trigger code blocks. In this case a swipe right reveals a check mark to mark the mail as read and remove it from the stack, and a swipe left reveals a yellow deferral option that triggers a popup menu to give you deferral choices in case you want to revisit the mail even though you wish it to disappear form the inbox stack. Now even google has gone on board and made their own implementation of this functionality with their inbox app.

MCSwipeTableViewCell
Enter the MCSwipeTableViewCell gitHub repo slash CocoaPod by AlikaRagoz. As the above gif demonstrates it gives you the option to give this functionality to any table view cell in your app and specify multiple swipe triggers for any actions you want to give them. Not only does it give you the single swipe left or right functionality of the mailbox app, it gives you different triggers at different swiping distances incase you need more functionality. The background color/icon, swipe distance, block functionality and even some delegate options are all configurable and in my app, “Tasks” I make use of these to handle task “snoozing”, completions and moving tasks from the inbox to different user generated lists.
How To Use
After creating a podfile, init’ing it, and installing your pods you will need to include it in your table view controller class. Then you need to start creating instances of the MCSwipeTableViewCell, usually within the cell dequeuing method that all table view controllers call when generating table view cells.
cell.firstTrigger = 0.1;
cell.secondTrigger = 0.6;UIView *checkView = [self viewWithImageName:@"check"];
UIColor *greenColor = [UIColor colorWithRed:85.0 / 255.0 green:213.0 / 255.0 blue:80.0 / 255.0 alpha:1.0];UIView *crossView = [self viewWithImageName:@"cross"];
UIColor *redColor = [UIColor colorWithRed:232.0 / 255.0 green:61.0 / 255.0 blue:14.0 / 255.0 alpha:1.0];UIView *clockView = [self viewWithImageName:@"clock"];
UIColor *yellowColor = [UIColor colorWithRed:254.0 / 255.0 green:217.0 / 255.0 blue:56.0 / 255.0 alpha:1.0];
This bit of code first sets up a UIView that becomes apparent behind the sliding table cell when the user swipes it. The first line just sets the view up with the desired graphic to show up, in our case a check mark, a clock and a cross. The second line for each view setup just sets the color it will use later.
[cell setDefaultColor:self.tableView.backgroundView.backgroundColor];[cell setDelegate:self];
Then we will tie our sub-classed MCTableViewCells together in the dequeue with the background views we previously defined and a block of code or selector defining the action that occurs once the swipe is over. The code for that is below:
[cell setSwipeGestureWithView:clockView color:yellowColor mode:MCSwipeTableViewCellModeSwitch state:MCSwipeTableViewCellState3 completionBlock:^(MCSwipeTableViewCell *cell, MCSwipeTableViewCellState state, MCSwipeTableViewCellMode mode) {

        NSLog(@"Did swipe \"Clock\" cell");

        self.alertController = [UIAlertController alertControllerWithTitle:nil

                                                                   message:@"Snooze the task!"

                                                            preferredStyle:UIAlertControllerStyleAlert];
UIAlertAction *snoozeTillTonight = [UIAlertAction actionWithTitle:@"Tonight"
style:UIAlertActionStyleDefault
handler:^(UIAlertAction *action)
{
//set the time for the
}];
UIAlertAction *snoozeTillTomorrow = [UIAlertAction actionWithTitle:@"Tomorrow"
style:UIAlertActionStyleDefault
handler:^(UIAlertAction *action)
{
//set the time for the
}];
UIAlertAction *snoozeTillNextWeek = [UIAlertAction actionWithTitle:@"Next Week"
style:UIAlertActionStyleDefault
handler:^(UIAlertAction *action)
{
//set the time for the
}];
[self.alertController addAction:snoozeTillTonight];
[self.alertController addAction:snoozeTillTomorrow];
[self.alertController addAction:snoozeTillNextWeek];[self presentViewController:self.alertController animated:YES completion:^{
NSLog(@"Presenting Alert View Controller");
}];
You may also want to define the background color when the swipe hasn’t reached the triggered action yet which you do with the first line in the above code. You may also want to set up the optional protocol delegates that the cell class provides.
// When the user starts swiping the cell this method is called

- (void)swipeTableViewCellDidStartSwiping:(MCSwipeTableViewCell *)cell {

    // NSLog(@"Did start swiping the cell!");

}
// When the user ends swiping the cell this method is called
- (void)swipeTableViewCellDidEndSwiping:(MCSwipeTableViewCell *)cell {
// NSLog(@"Did end swiping the cell!");
}// When the user is dragging, this method is called and return the dragged percentage from the border
- (void)swipeTableViewCell:(MCSwipeTableViewCell *)cell didSwipeWithPercentage:(CGFloat)percentage {
// NSLog(@"Did swipe with percentage : %f", percentage);
}
I’ve been heavily using this cocoa pod for my own personal app, Just.Do. Personally I love how it provides a quick and easy way to alter the meta-data associated with the tasks of a task manager that you’d normally have to dive into a detail view and make several extra taps or inputs in order to assert. Here, you just swipe left to reveal the yellow colored snooze view which then brings up the snooze alert view to allow you to put the task off to later the same day, the next day or next week.
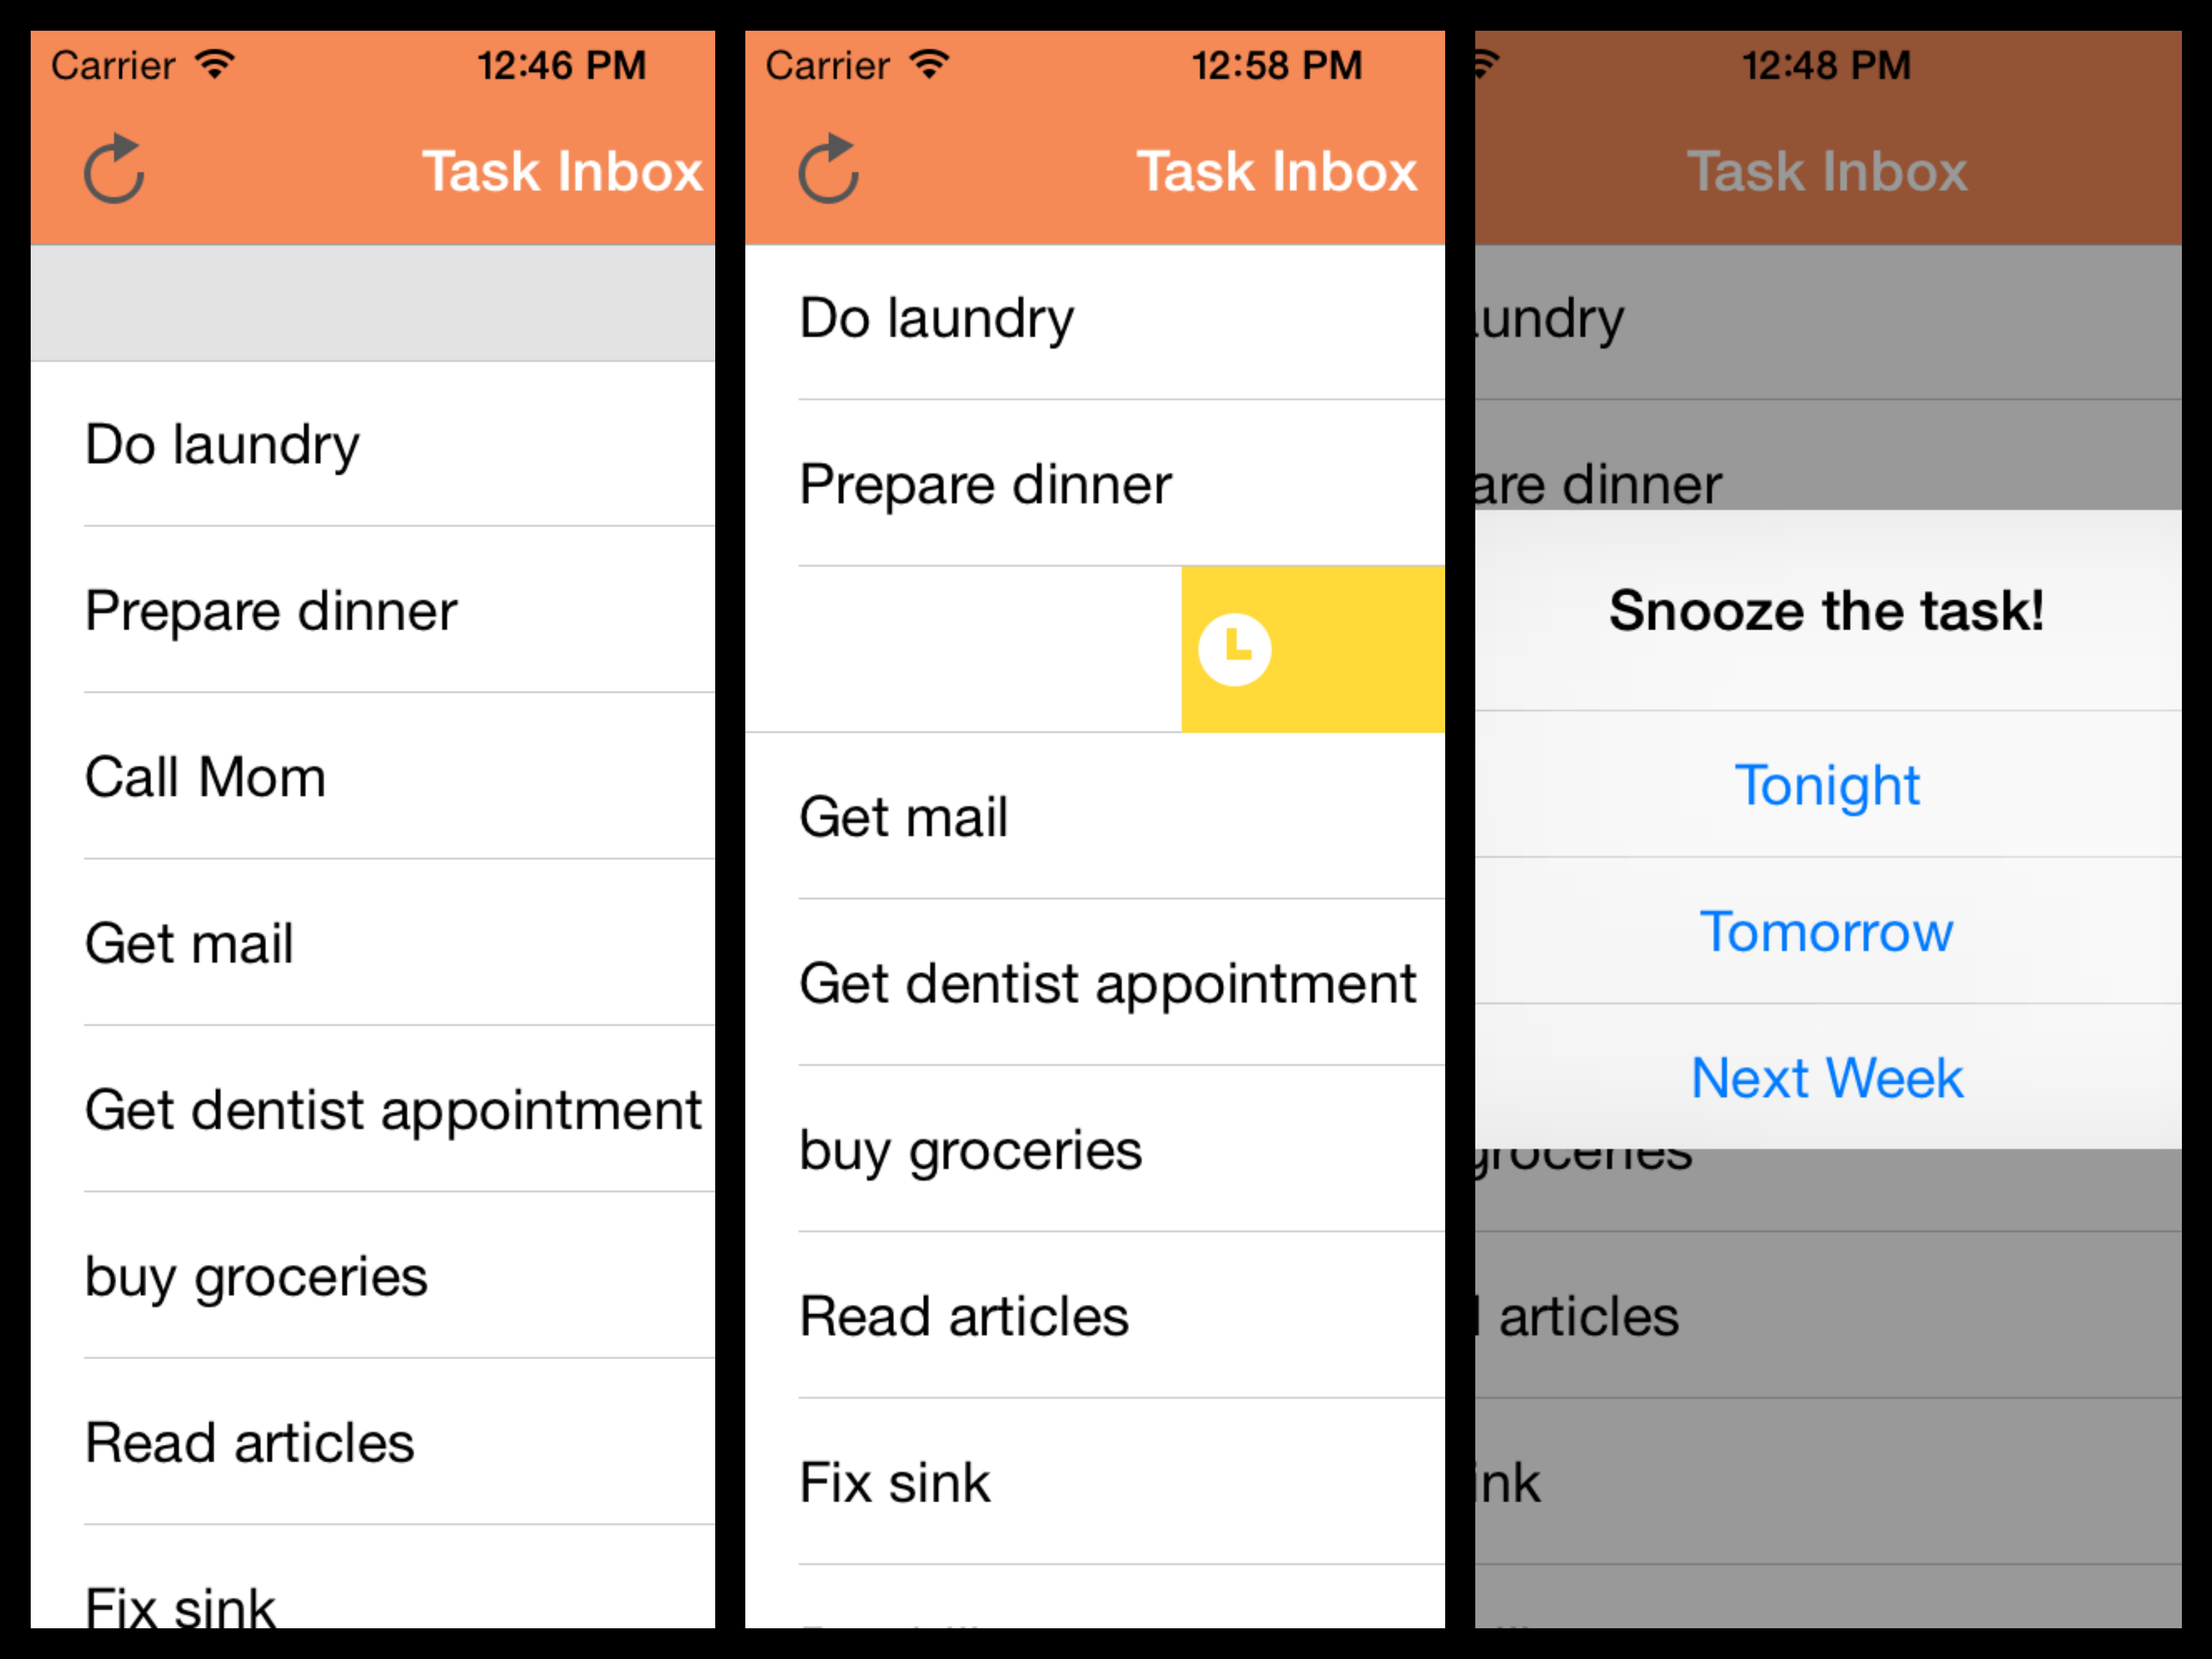
This is great because now changing the due date of the task requires only two tap inputs that previously required selecting the task to take you to a detail view, tapping some kind of date/time picker and then finally saving those changes and going back to the list view for the next task. So hot!
